Lab 2: Securing APIs at runtime using Flex Gateways
Overview
Duration: 15 minutes
In Lab 1, we discovered and cataloged APIs. In Lab 2 we will deploy a Flex Gateway to protect our Payments API.
Flex Gateway is an ultrafast gateway designed to manage and secure APIs running anywhere. To protect our existing service we have to deploy a flex gateway and then add the existing API/Service to the running Flex Gateway.
Once we add the service to Flex Gateway we will be able to manage, monitor, and secure the API through the Anypoint Platform UI.
Step 1: Setting up the Environment
This tutorial will use a docker container, however Flex Gateway can also be installed as a Linux Service or a Kubernetes Ingress Controller.
Installing the Payments microservice
Before Flex Gateway can protect an API we need to have a service to protect. Luckily we have one that will be used for this demo. It is based on the Accelerator SAP S/4HANA Invoice Payments System API. In lab 1, we already discovered, cataloged, tagged and published this API Specification into Anypoint Exchange.
In this lab, we will use Flex Gateway to protect a polyglot payments microservice that implements such API Specification.
For this lab, you can leverage the terminal via RDP or your SSH session from the last lab. To run this payments service, check that you are located in ~/workshop-assets/microservices/payments. Verify this output by running:
pwd-
Then, using docker, run the Payments service.
docker run -d -p 3000:3000 -d mulethunder/payments:1.0This will download the payment Docker image. Depending on the Internet speed, this could take a minute or so.
-
Verify the service is running by issuing the following command:
docker psThis will show that the payments container is up and running. Accepting connection on port 3000.

-
Let’s test this service, to make sure that it responds successfully.
curl http://localhost:3000/payments[http://localhost:3000/payments] | json_ppThe response starting with the following should appear
Great, we can now configure Flex Gateway to route and protect this Payments microservice.
Step 2: Configuring Flex Gateway in Connected Mode
Create Flex Gateway:
-
We will need to register the flex gateway with the control plane before we get started.
-
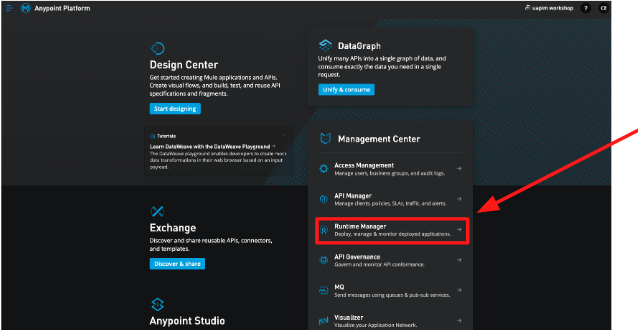
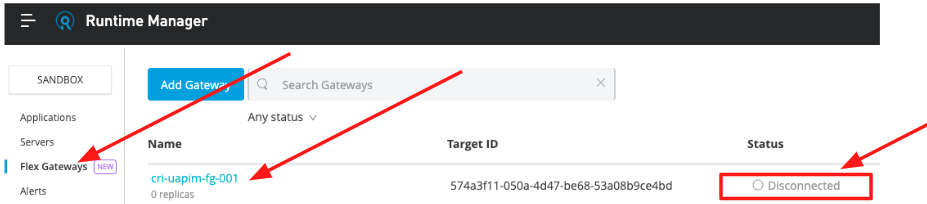
Go back to Anypoint Console and then go to Runtime Manager.
-
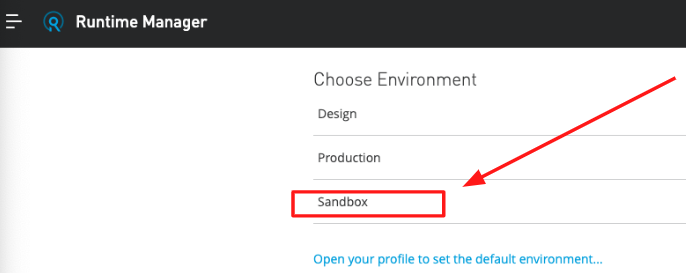
If you get asked to choose an environment, select Sandbox
-
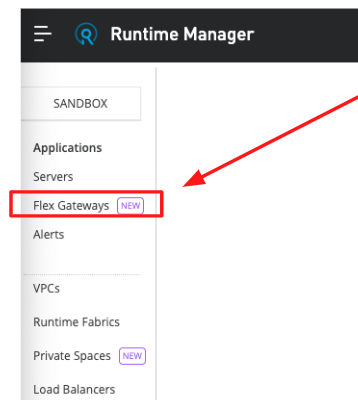
From the left menu, click on Flex Gateways
-
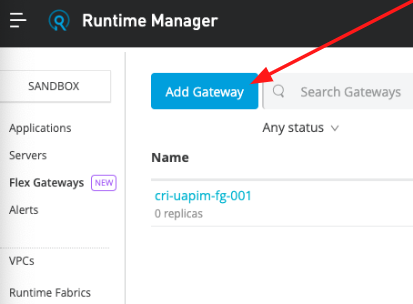
If this is the first Flex gateway that you add, click on " Add Gateway "
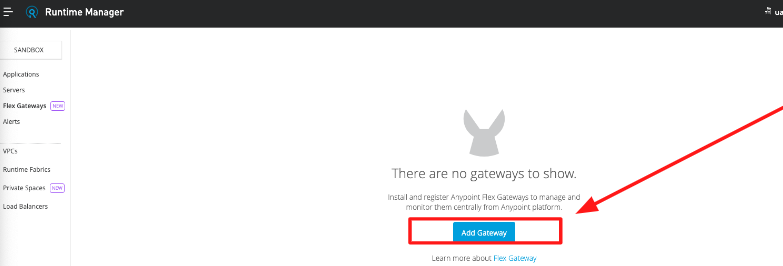
-
Otherwise, if other Flex Gateways have been already created, then you need to find Add Gateway at the top of the middle page

-
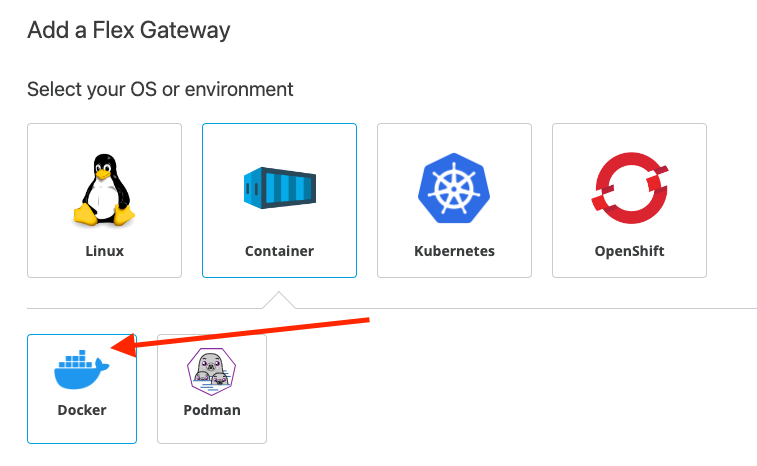
Notice all the different options that you have available to run Flex Gateway.
image:img_7.png[]
-
In this case, we are going to use Docker. So, click on Container first, and then click on Docker :

-
Ignore the step 1 - “Pull the image” since we will automatically download the latest version of the container.
Before we proceed, let’s make sure that we are setting a working directory to download the Flex Gateway configuration file descriptor, which will get downloaded after registering the flex gateway.
-
Create a directory under:
mkdir -p $HOME/workshop-assets/flex-gateways-
Move to this new directory
cd $HOME/workshop-assets/flex-gateways-
Make sure that this directory is empty
ls -l
-
Now let’s proceed to register our Flex Gateway.
IMPORTANT : From step “2. Register your gateway“ , copy the command that is provided. Take note of the token and organization values, as they have been pre-populated by Anypoint Platform and are specific to your user and account.
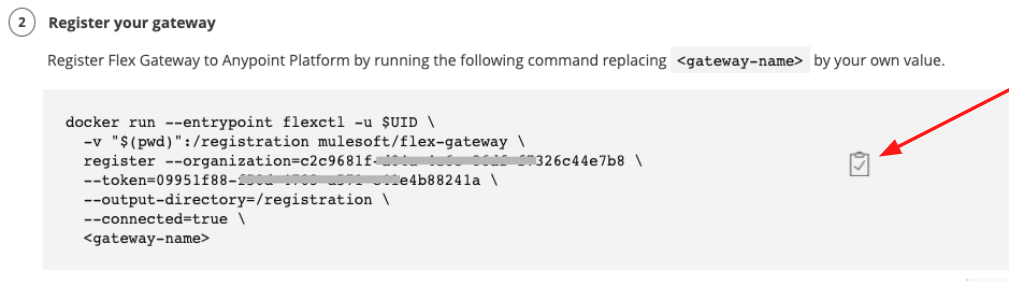
Important: Notice that we are changing the <gateway-name> with a name for your Flex Gateway instance.
-
Since we are working on a shared Business Group, let’s make sure to prefix the name of our flex gateway with your initials, so that we can identify it quickly.
For example, since my initials are “cri” , I am going to choose this name:
cri-uapim-fg-001 |
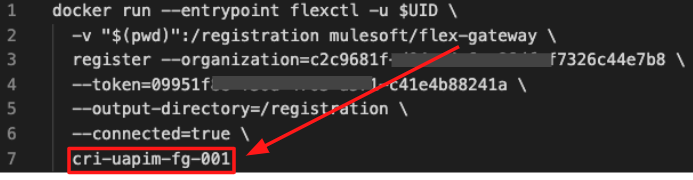
Note: Feel free to choose whatever name you want, as long as you don’t forget to prefix your initials, so that you and other attendees of this workshop don’t get confused.
-
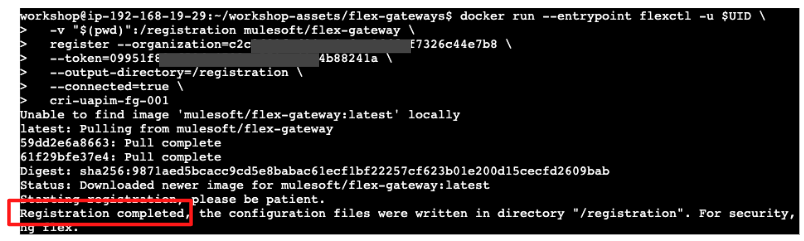
Now, copy and paste into the terminal the command that we curated with the gateway name.
First , it is going to download the Flex Gateway latest Docker image. Then , it is going to register the Flex gateway in Connected Mode into our Anypoint Platform Control Plane.
Upon successful registration you will see a message like the one below:
-
Check the content of this directory again.
ls -l-
This time you will see that the registration configuration YAML descriptor has been created. This file contains the Flex Gateway registration configuration, the certificate and private key. Everything it needs to auto connect to the Control Plane when needed. It’s that easy!
-
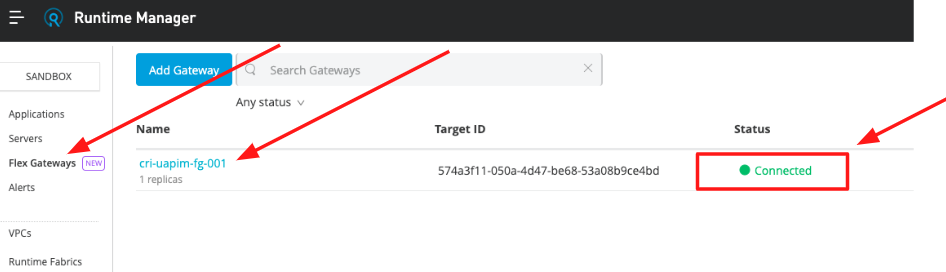
Before running Flex Gateway, let’s go back to the Anypoint Runtime Manager → Flex Gateways in the web console. Notice that your Flex Gateway has been successfully registered in the Runtime Manager, but it is shown as “Disconnected”
-
Let’s run it, for this go back to the stage where you add a Flex Gateway, so that we can simply copy the next command. That is, click again on “Add Gateway”
-
Click on Docker
-
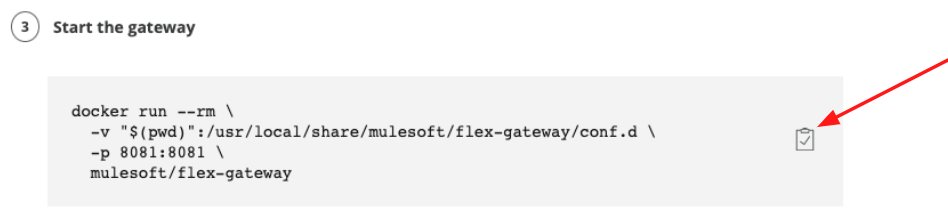
And now let’s copy step 3. Start the gateway
-
Before we paste and execute this command, let’s analyze what it does. Let’s take a look:
-
docker run - tells docker to run the latest version of the Flex Gateway image, located at mulesoft/flex-gateway (GitHub Docker Repository)
-
-v "$(pwd)":/usr/local/share/mulesoft/flex-gateway/conf.d - This mounts a volume on the local machine to the container. This will be to share the configuration obtained during the registration, within the Flex Gateway container.
-
-p 8081:8081 - This tells docker to expose local port 8081 and map it to port 8081 on the container.
Note: You can repeat this approach to start multiple replicas of this Flex Gateway.
-
Now, let’s execute this command in the web terminal
When the container starts the following messages should appear:
[flex-gateway-envoy][info] admin address: /tmp/flex-gw-admin.sock+[flex-gateway-envoy][info] loading tracing configuration+[flex-gateway-envoy][info] loading 0 static secret(s)[flex-gateway-envoy][info] loading 2 cluster(s)[flex-gateway-envoy][info] loading 0 listener(s)[flex-gateway-envoy][info] loading stats configuration[flex-gateway-envoy][info] RTDS has finished initialization+[flex-gateway-envoy][info] cm init: initializing cds+[flex-gateway-envoy][warning] there is no configured limit to the number of allowed active connections. Set a limit via the runtime key overload.global_downstream_max_connections+[flex-gateway-envoy][info] starting main dispatch loop+[flex-gateway-envoy][info] cds: add 1 cluster(s), remove 2 cluster(s)[flex-gateway-envoy][info] cds: added/updated 1 cluster(s), skipped 0 unmodified cluster(s)[flex-gateway-envoy][info] cm init: all clusters initialized+[flex-gateway-envoy][info] all clusters initialized. initializing init manager+[flex-gateway-envoy][info] all dependencies initialized. starting workers |
-
Go back to the Runtime Manager → Flex Gateways in Anypoint Platform web console. Notice how this time your Flex Gateway is Connected , up and running. Waiting to secure and protect APIs, as well as providing API observability.
Leave this terminal running and handy, so that you can watch the logs in the next section as you configure APIs in Anypoint API Manager for this Flex Gateway.
Step 3: Secure and Protect Payments API
In this scenario we will take our payments service and expose it as an API within Anypoint Platform. This will enable us to monitor, store it in Exchange for reusability, and provide security against it in a later scenario.
First, let’s create a new API in Anypoint API Manager that hooks into the Flex Gateway that we installed in the previous step.
-
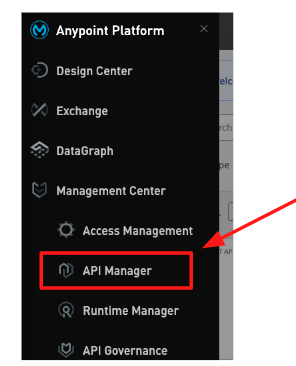
In the Anypoint Platform menu select Anypoint API Manager
-
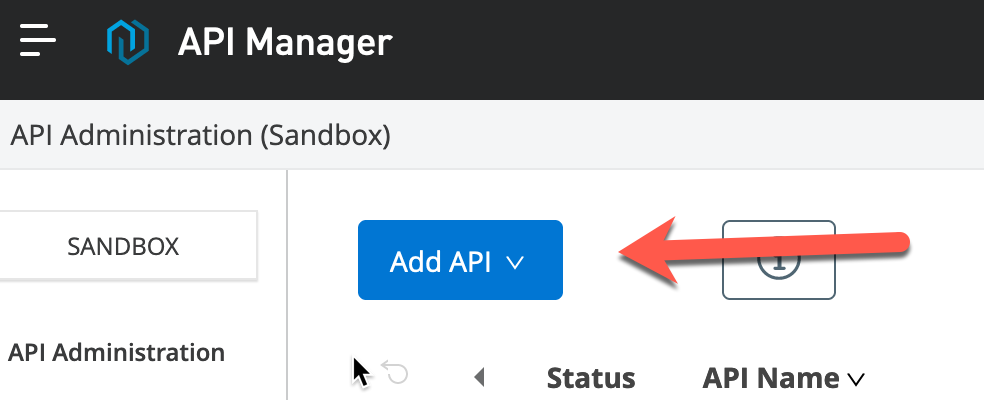
If asked, choose Sandbox environment

-
Click Add API
-
Click Add New API

-
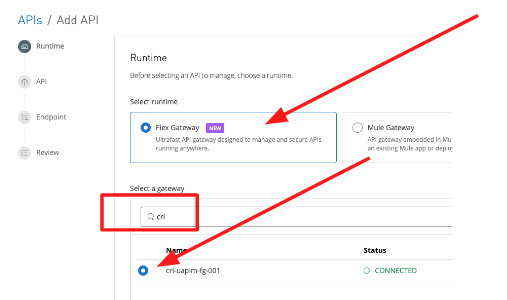
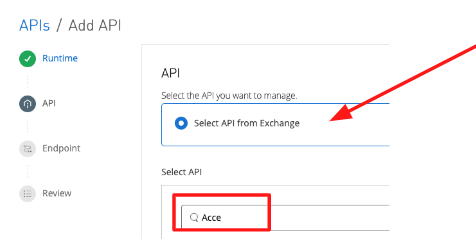
Ensure Flex Gateway is selected as the target runtime. Also, make sure to identify and select your own Flex Gateway. You should be able to easily identify your own flex gateway by entering your initials in the Search field. Then click next:
-
Click Select API from Exchange (if not selected already). Enter the beginning of the API Specification, remember that the full name is “Accelerate SAP S/HANA Invoice Payment System API”, so just by entering something like “Acce” would do.
-
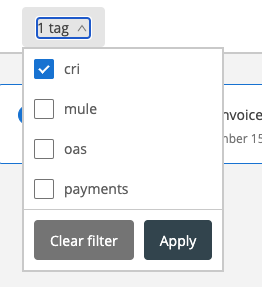
Click on Any tag , search for your initials and select them. Then click Apply .
-
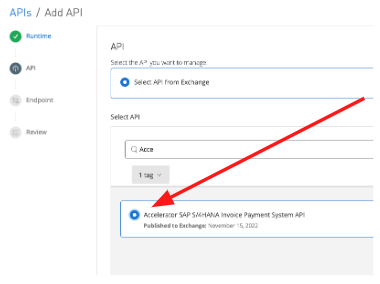
Locate and select your API Specification (there should be only one)
-
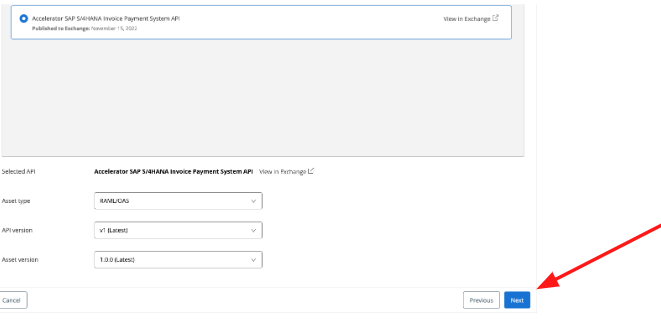
Leave all default options and click Next .
-
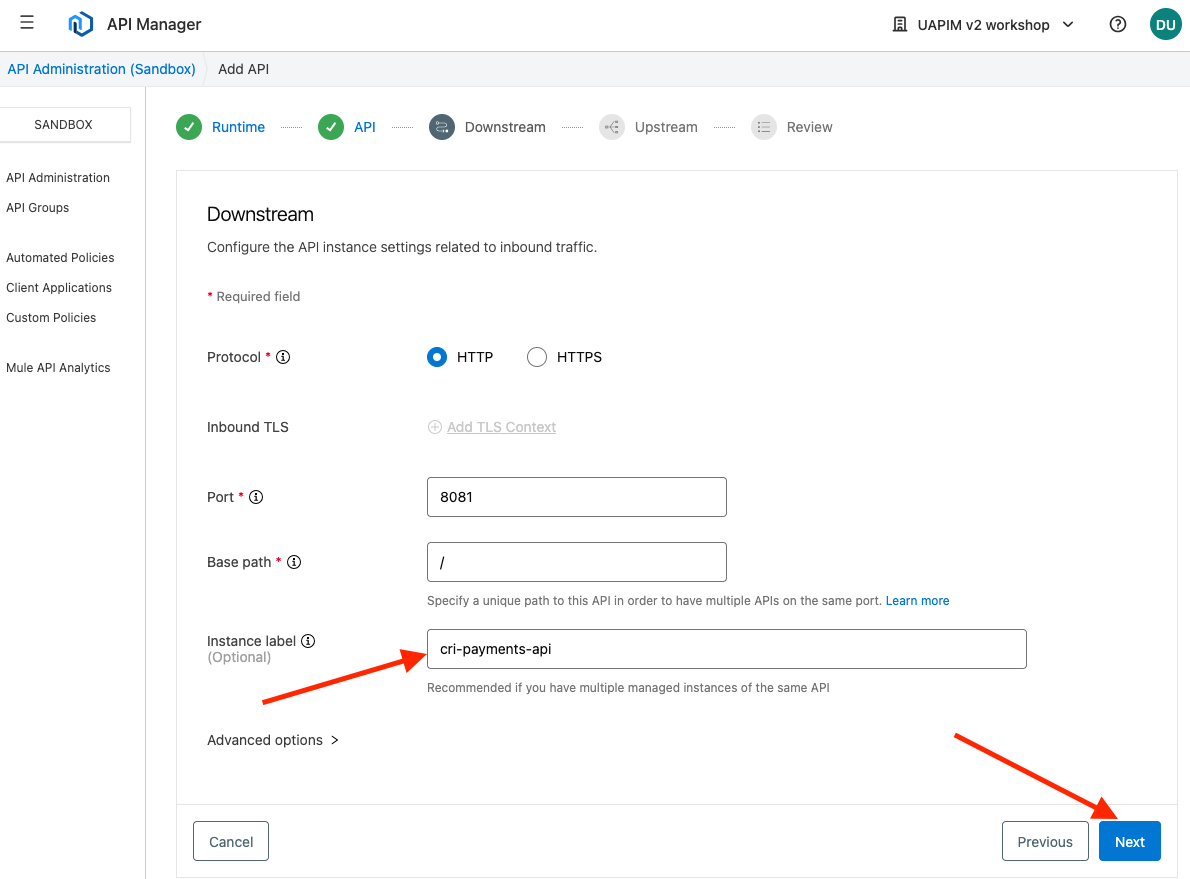
Now, let’s configure the API endpoint:
-
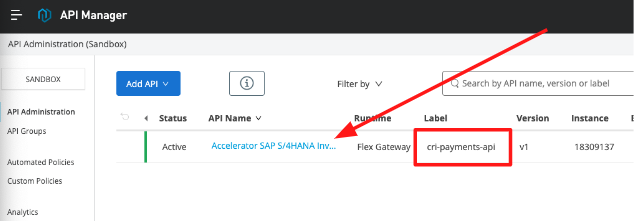
API instance label: ** Starting with your initials, give it a name,
-
e.g.: cri-payments-api
-
Port: 8081
-
Protocol: HTTP
-
Leave everything else untouched and click Next
-
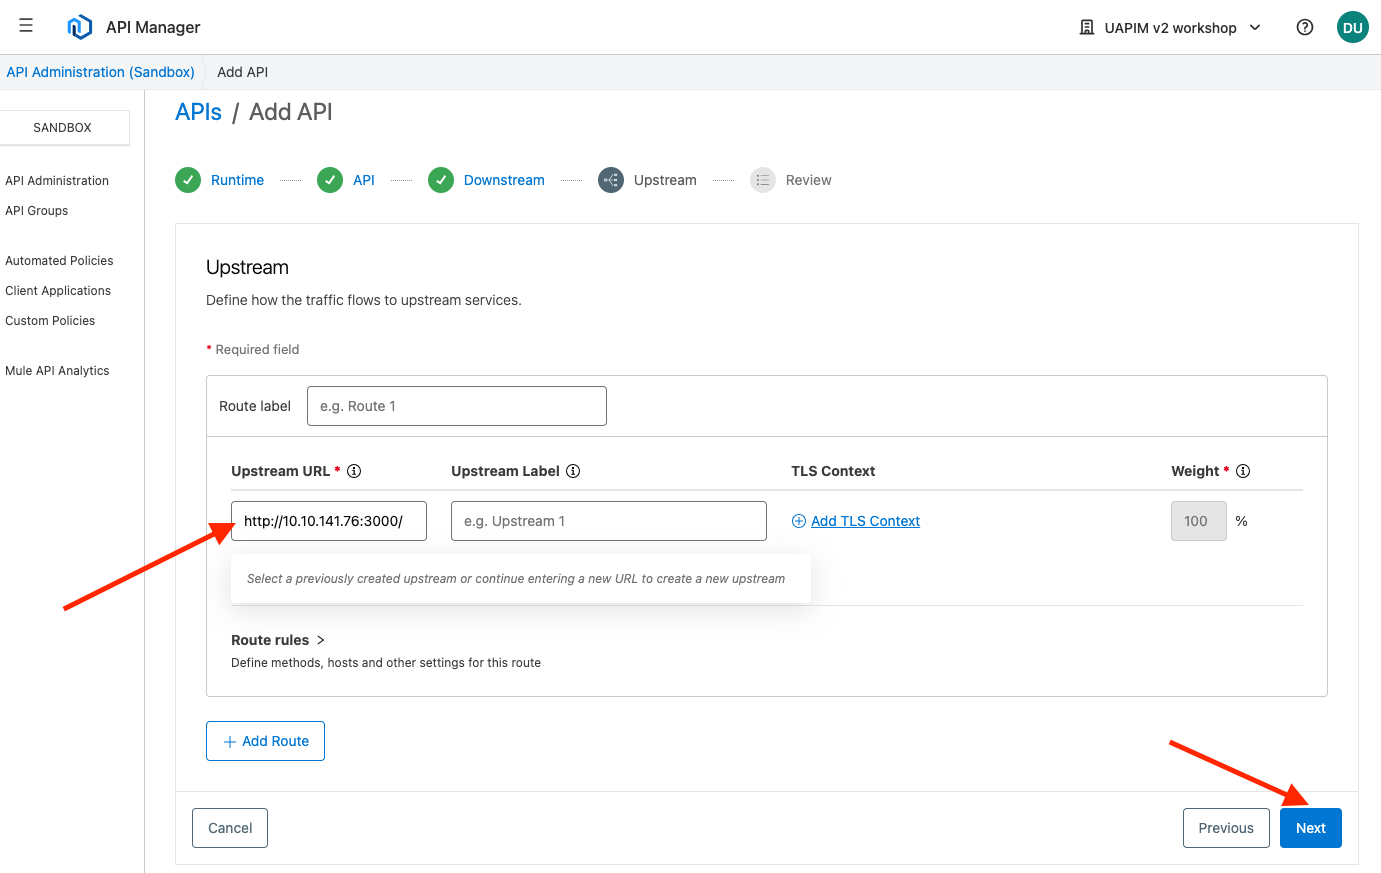
Upstream URI: This is the internal payments microservice URL. This is also called the implementation URL
IMPORTANT : Be mindful of the last “slash” ( /) at the end of the URI… Also, notice that you need to replace the <Your-Personal-IP-Address> with the actual IP Address where you are running the Payments service, in this case the same internal IP Address of your VM that you used when connecting to the Web Terminal. You cannot use localhost nor 127.0.0.1
-
Leave everything else untouched and click Next
-
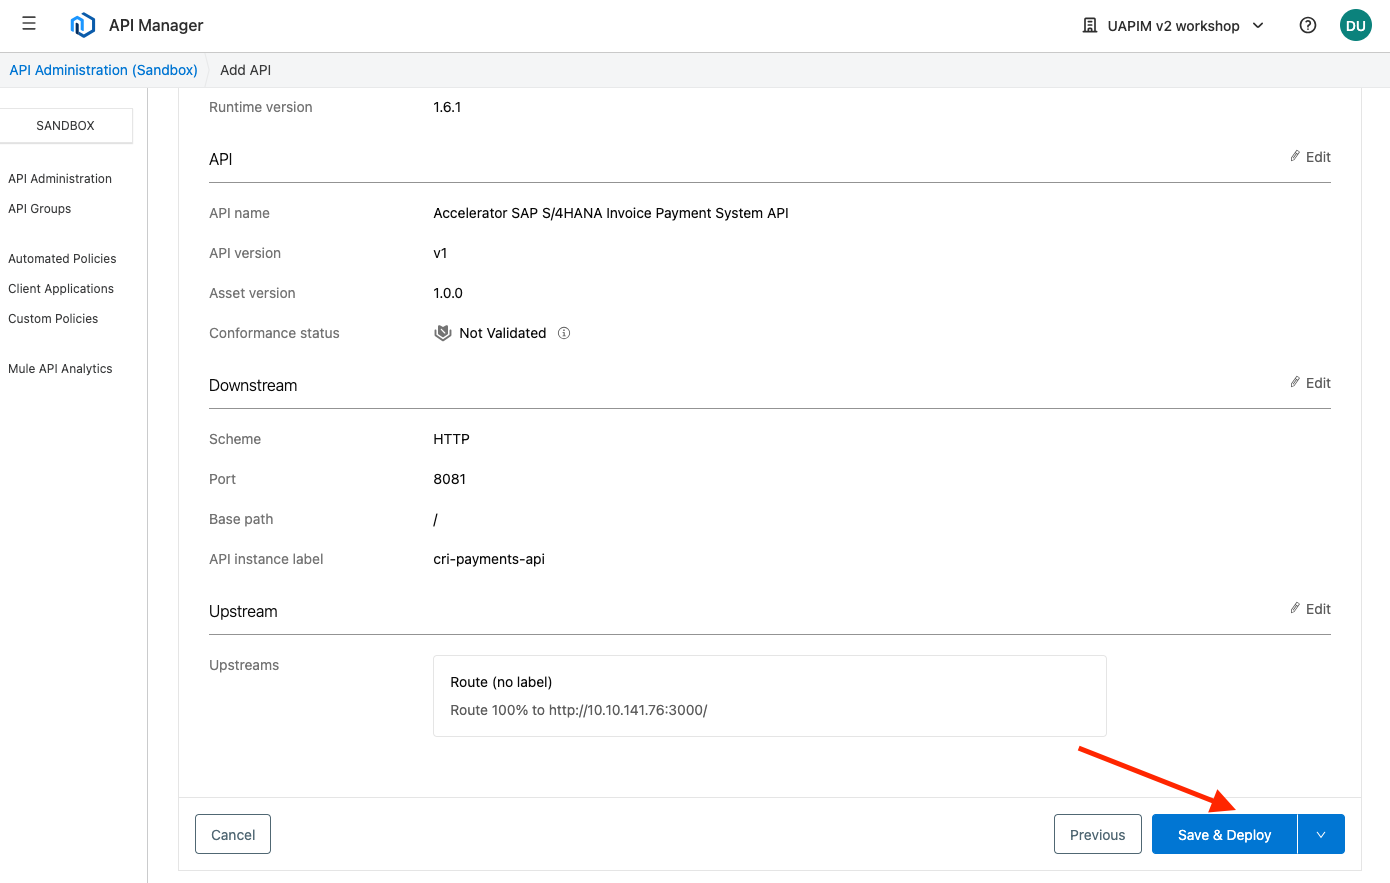
Click Save and Deploy
-
If you can quickly go to the Web Terminal that is running your Flex Gateway. Notice that it immediately receives the instruction to load this new API.

-
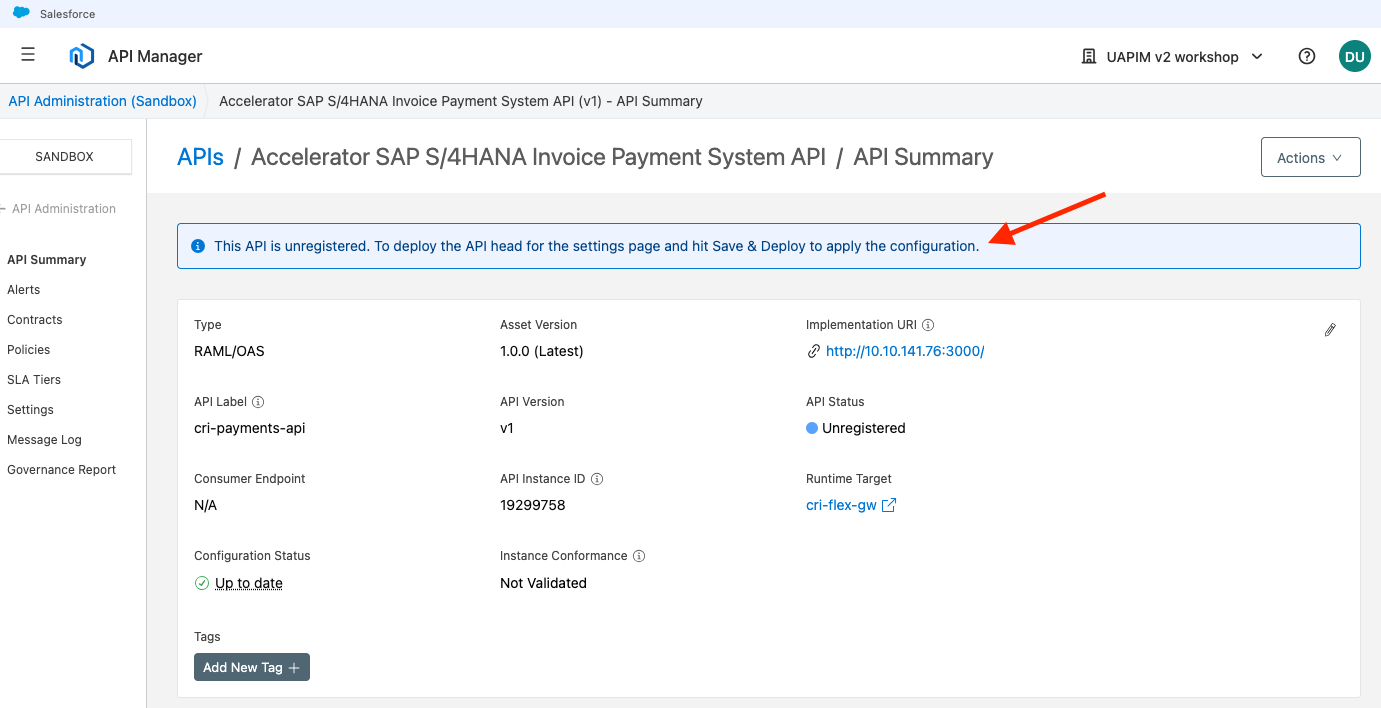
In API Manager, You might get a screen that says “This API is unregistered”.
-
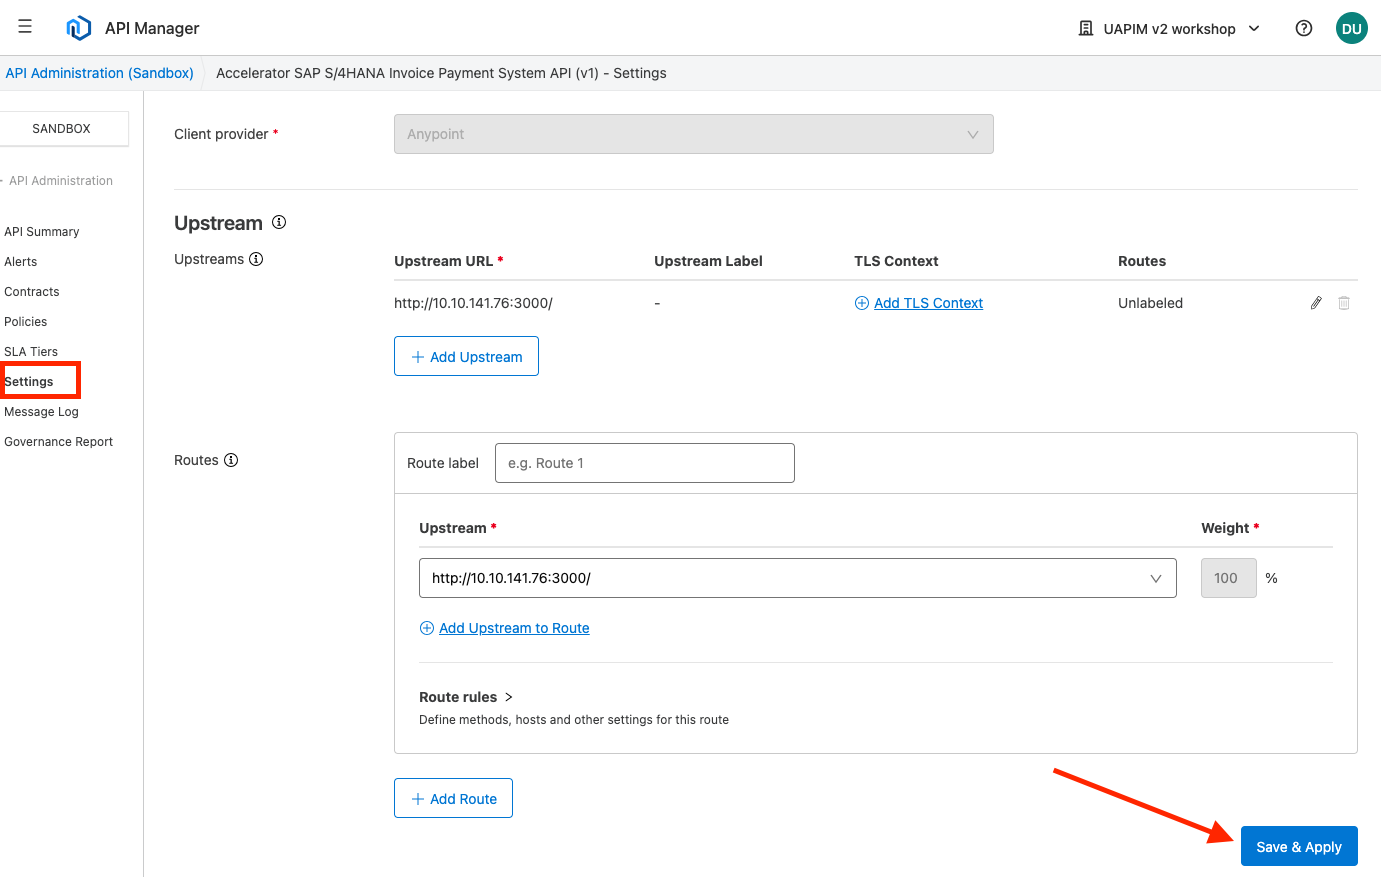
Click on Settings in the left panel. Then click on Save & Apply
-
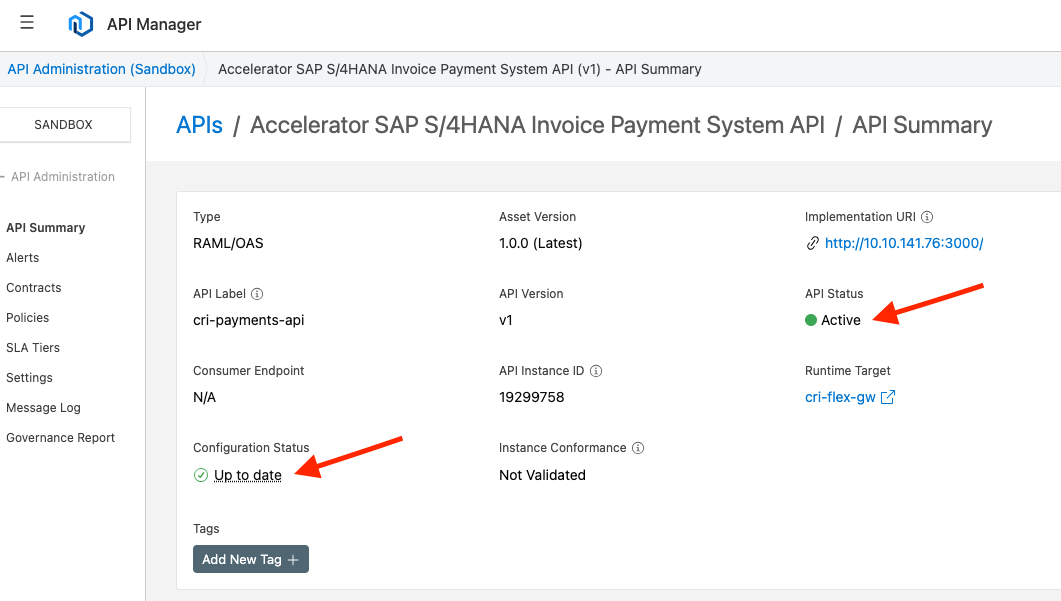
In the API management console verify the following:
-
API Status is Active
-
Status is Up to date
-
-
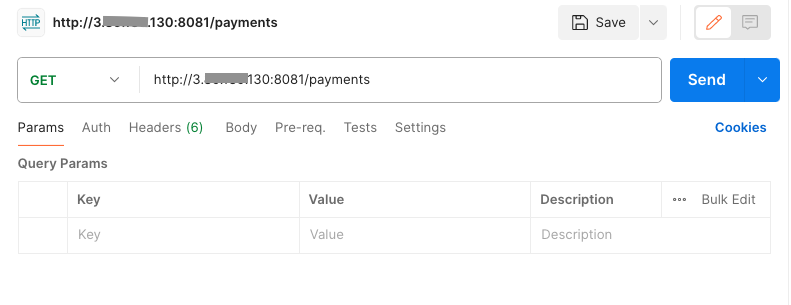
For the purpose of this Lab, we are going to test this API with a Test API Client (Postman). Open Postman and enter the following endpoint:
http://[external-ip]:8081/payments |
Where [external-ip-address] represents the private IP Address of your allocated VM. You should have received this information by email. However, if in doubt, ask your instructor. For example:
-
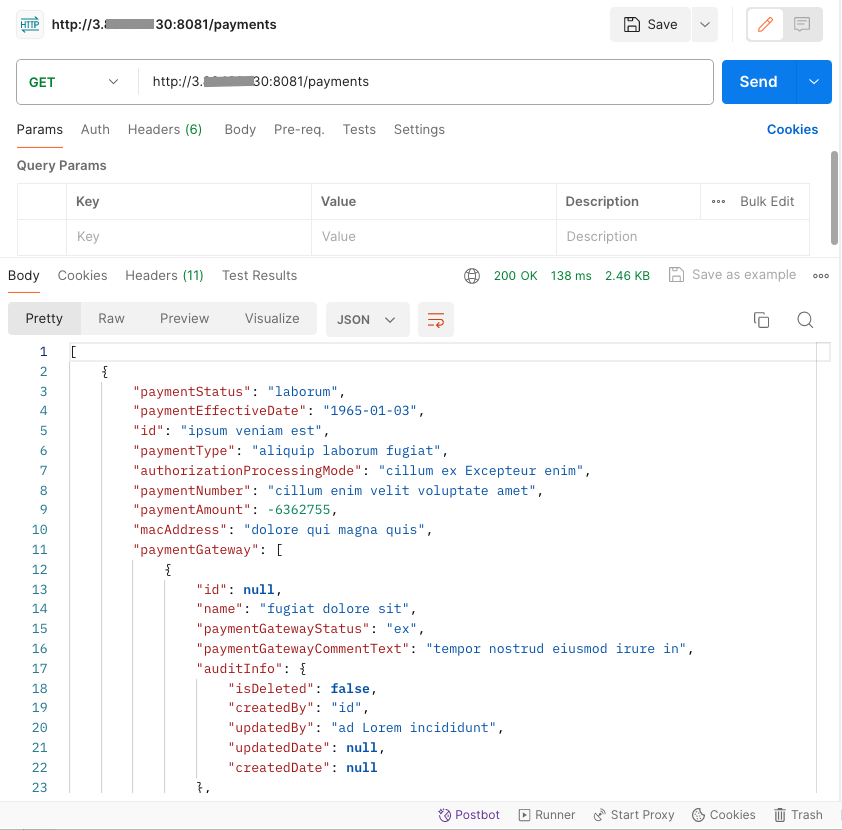
Click the send button. You should receive a successful 200 response
Congratulations. We have now exposed our payments service as an API and stored it in exchange, so that it can be discovered and reused. In the next section we will see how the API can be protected.
Step 4. Securing and Protecting the Payments API (Connected Mode)
Now that we have exposed our Payments API, it is now time to secure and protect it. Notice that depending on your needs and requirements, Flex Gateway supports 2 modes of configuration, Connected and Local.
In “Local Mode”, you can configure Flex Gateways using YAML file descriptors “locally” to where you are running your Flex gateway(s) and route all API telemetry to existing local API Monitoring software, that you may have already in-place and wish to utilize.
In “Connected Mode”, you can leverage the Anypoint API Management console to easily configure, secure and protect your APIs from within the Anypoint Web Console or platform APIs for CI/CD pipelines. In connected mode, all API Telemetry is automatically routed to Anypoint Monitoring for easy access and consumption.
In this section, we are going to use API Management to configure our Flex Gateway (i.e. Connected Mode).
-
In API Manager select the Payments API that we created previously. Make sure it is the one with the label starting with your initials.
-
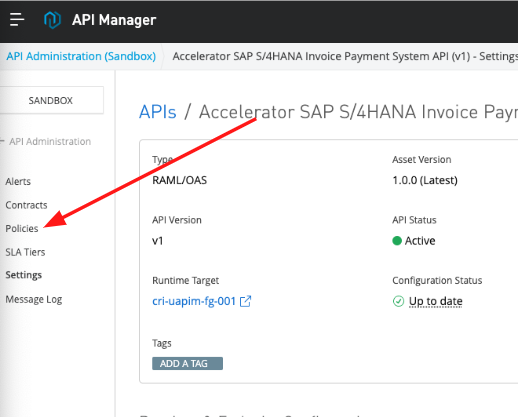
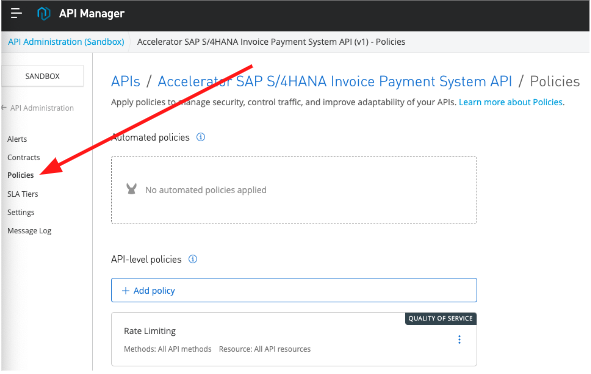
Once you clicked on your own API. Then, in the left menu, click Policies .
-
Click on Add Policy to add a rate limiting policy

-
Notice the many policies, ensure that Rate Limiting is selected and click next :
-
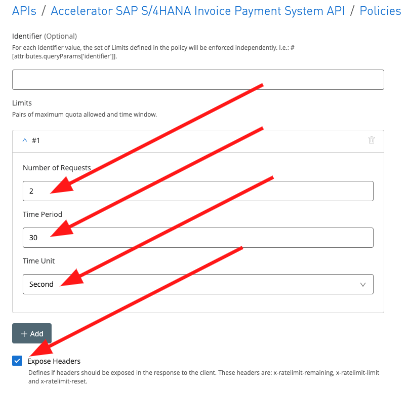
Enter the following:
-
Number of Requests: 2
-
Time Period: 30
-
Time Unit: Seconds
-
Ensure Expose Headers is checked
-
Click Apply
-
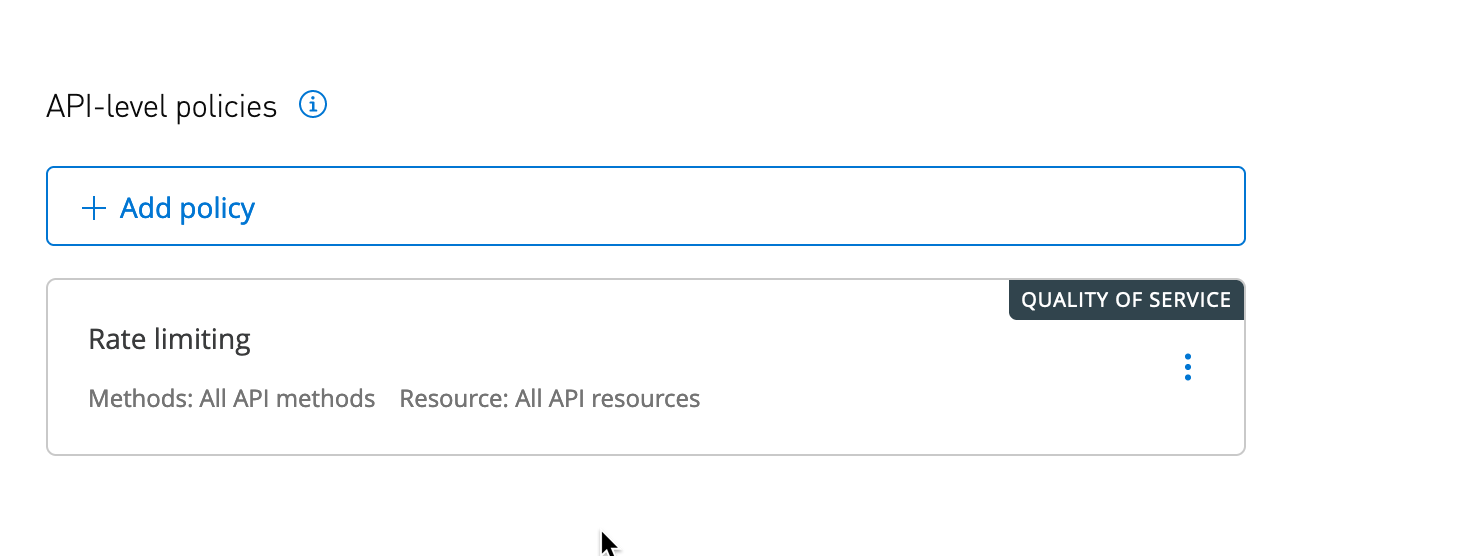
The Rate Limiting Policy is now applied:
 Note: If you are quick enough, you will see in the web terminal that this policy is immediately applied by the Flex Gateway.
-
Using the Postman Test tool, we will test the API as we did in the scenario before. Note: if you have problems with the policy, try disabling your VPN.

-
Verify Successful call:

-
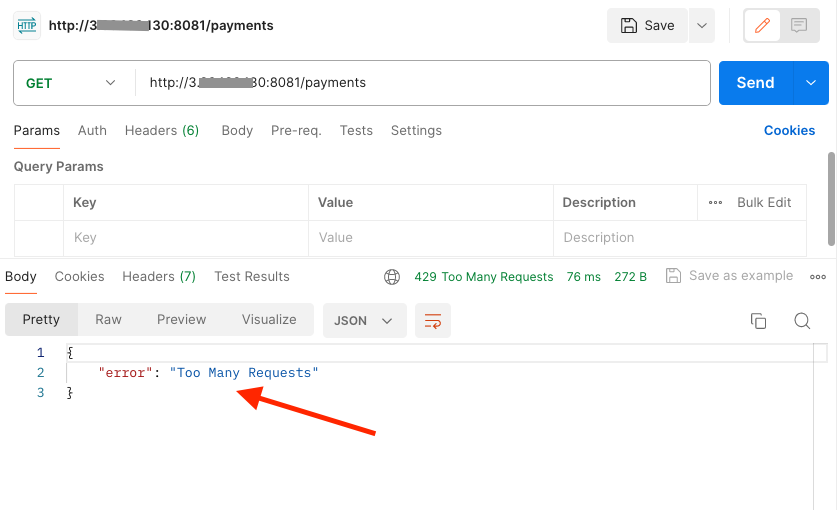
Click send a few more times in rapid succession. After the 3rd attempt, you should get a 429 Too Many Requests response

The API rejects the connection to the backend payments service due to the amount of requests being sent. This allows an API to be protected from DDOS attacks or simply over utilization of the back-end service.
We have now successfully applied “Rate Limiting” protection policy to our payments API. In the next section, we will add security too.
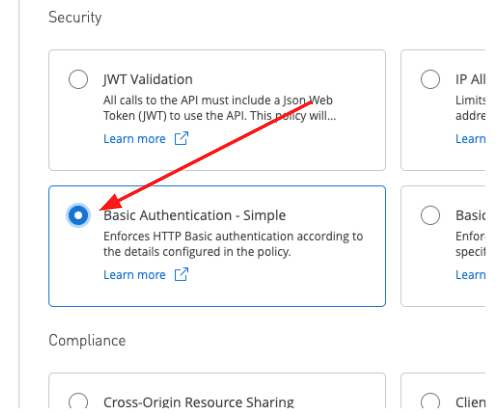
Step 5: Adding Basic Authentication
Now to secure our payments API, we will add a simple basic authentication policy to protect our API calls by requiring a username and password. This is one of the most common Authentication security policies. However, notice in the catalog of policies, that Flex Gateway supports a wide range of Authentication and Authorization policies.
-
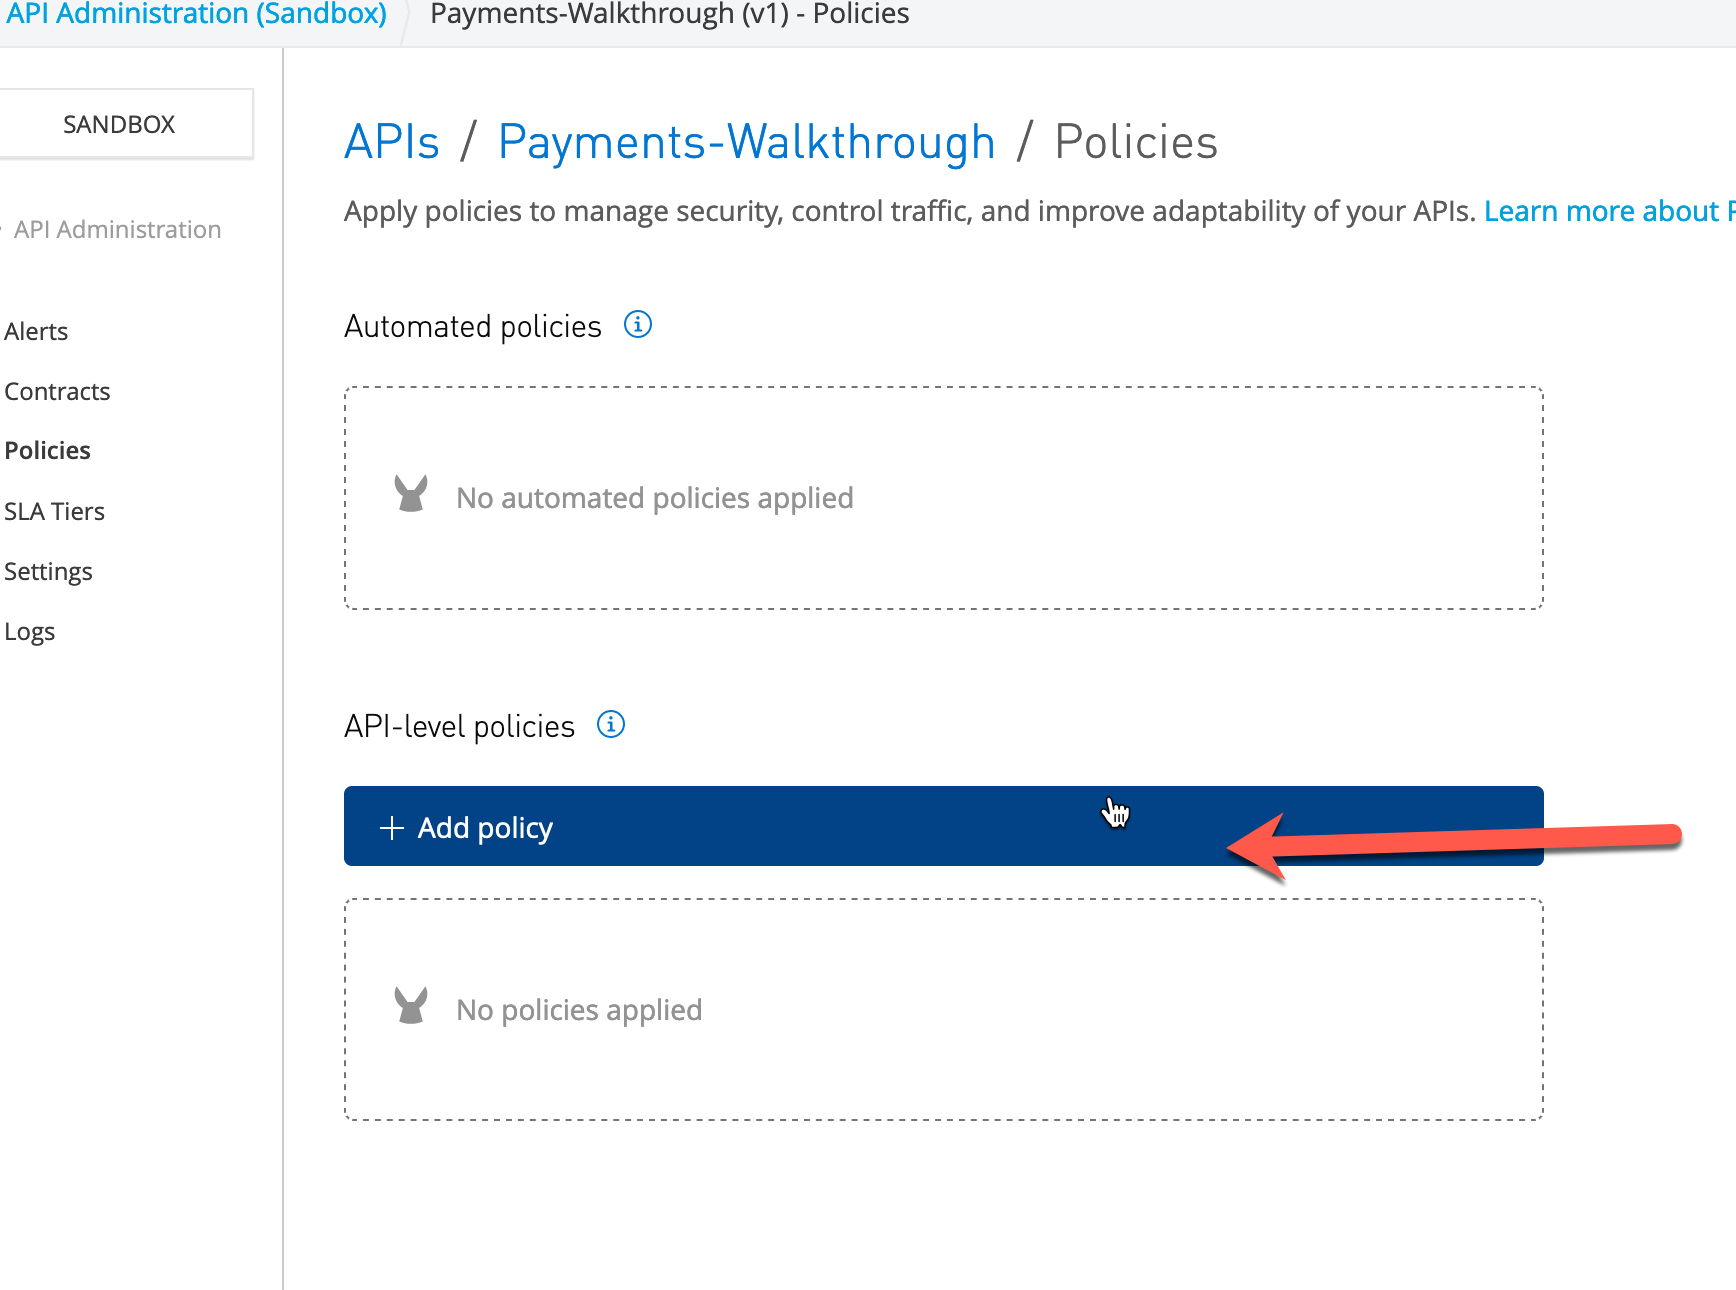
If not there already, go back to the Policies section of your Payment API.
-
Click again on Add Policy
-
Choose Basic Authentication - Simpl e from the security section.
-
Click Next
-
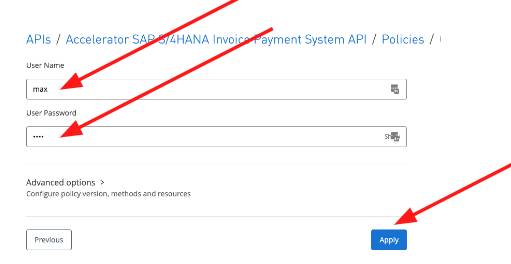
Finally, configure the username and password
-
Username: max
-
Password: mule
-
-
Press Apply .
-
Now you have 2 policies being enforced, Rate Limiting and Basic Authentication :
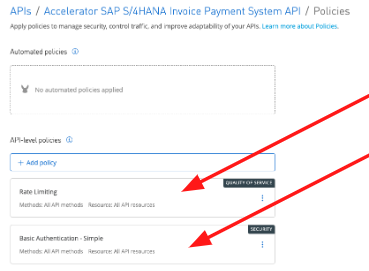
-
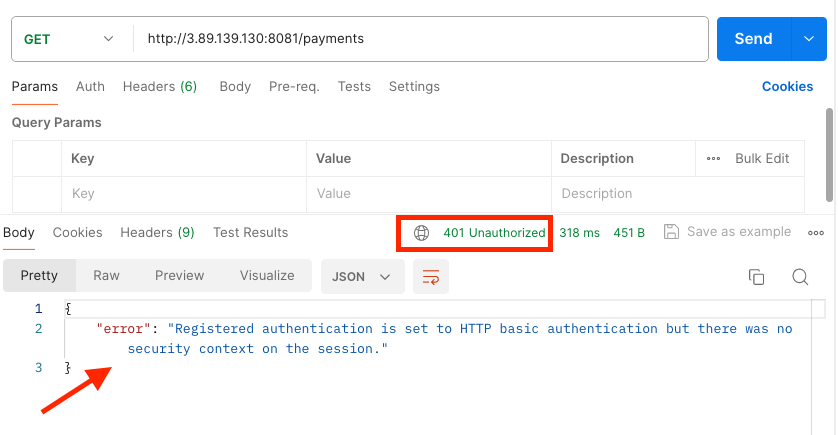
Once more, test your Payments API using Postman. This time you should get a 401 Unauthorized error response, saying that HTTP Basic Authentication is being enforced.
-
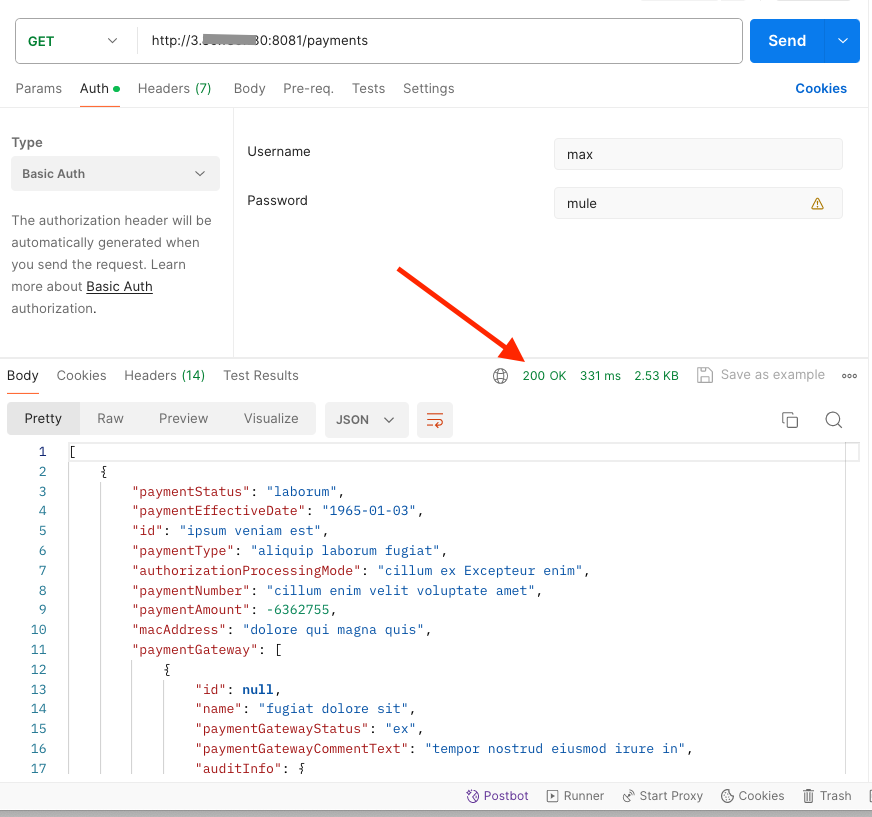
Select the Auth tab and Select “Basic Auth” as the Type. Provide max and mule as the username and password. Then click Send .
image:img_50.png[]
-
Make sure that you get a successful 200 message response
-
Try a couple of attempts and confirm that you once again exhaust the allowed rate.
Congratulations! We have now protected and secured our Payments API with a rate limiting and basic authentication policies. Nicely done!
In this Lab, we have shown you how to register and configure Flex Gateway to facade a polyglot microservice, using our Anypoint Control Plane to configure, secure and protect the backend microservice with policies.
In the next lab, we are going to show you how to use our Control Plane to provide API Telemetry around the traffic going through the Flex Gateway.